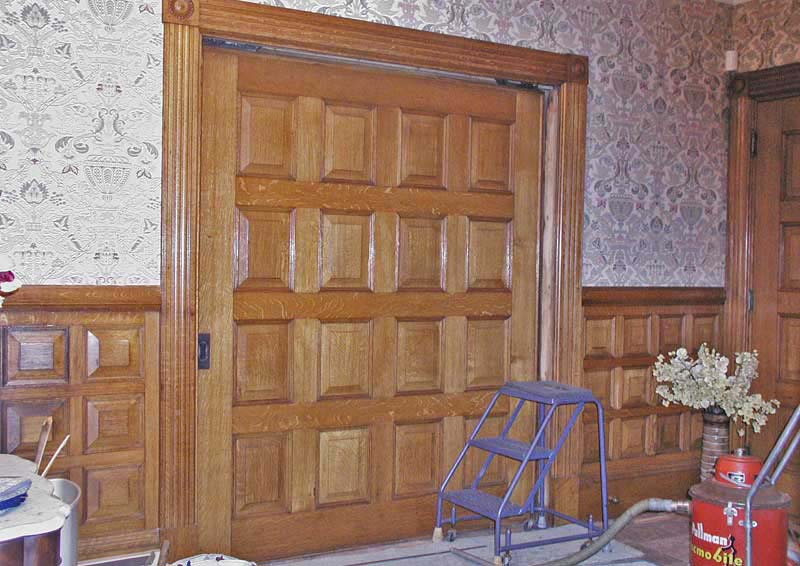
[From an email to the contractor in Ohio-see "Major Fabrication"]
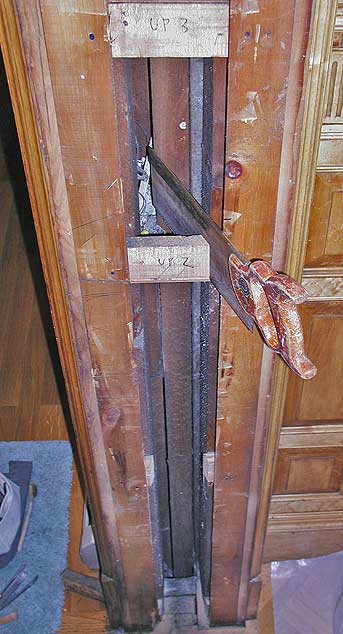
Good morning David. I have no way of knowing just how much your crew can discern from inspecting the surviving pocket. Here are guidelines for building a pocket door partition when using Lane steel track and hangers. I intend to use this email and the next one as the basis for a web page on the subject of ratios and proportions.
Let's start with something you do not have-a pair of doors. Why? Because it enables us to clarify a lot of points. When you have a pair of doors, you have four geographical areas. You have a "west door" which is either in the west pocket (hidden) or it is visible (and occupying the location between the entrance to the west pocket and the "50 yard line.") And you also have an "east door" which is either in its east pocket or is brought out from its pocket to make a closure-resting therefore between the entrance to the east pocket and the "50 yard line." With a pair of doors it is possible to shuffle things around-to position either door in "foreign" territory.
EVERYTHING about pocket doors...is ratios, proportions and clearance.
But there is another thing underlying the lateral measurements and the spatial proportions. It was the inherent need, indeed the wisdom, of the inventors to provide for future adjustments. The patent holders were in competition-they wanted their product to endure the ravages of time. They knew about building movement. They foresaw settling of piers and sagging of beams. Most hangers (but not all) have angular slotted inclines which are the connection between the door top plate and the hangers. And most (but not all) hangers have adjustment screws for height.
Pocket doors have a leading edge and a trailing edge. With a pair of doors, the leading edges "kiss" each other. Trailing edges, by definition, are alway in the dark.
If you have a pair of doors and if a door is out of plumb with the jamb or the meeting moldings aren't parallel, you can adjust the leading edge by simply walking up to it. If you want to adjust the trailing edge adjustment screw, it is possible to withdraw a door it from its pocket and move it past the 50 yard line-where it ordinarily does not go. Thereby you expose the trailing edge and you can access the screw at the trailing edge.
But with a single door, you only have two geographical areas. [This is a 'half-truth'--read on.] One pocket and one doorway. The deal is...with a single door, the adjustment screw above the leading edge is always accessible. However the adjustment screw above the trailing edge is never accessible. This is unacceptable. A mechanic absolutely has to have access to both adjustment screws-even if it is only once every 50 years.
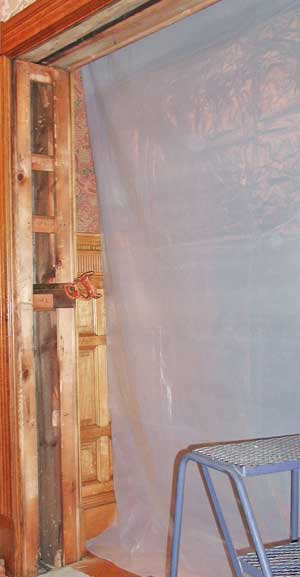
Therefore, David, having access to another partition which was not destroyed by fire, and because you sent me a photo of the surviving door being held upright in the middle of a room, I assume that you have discovered that there is a "demi pocket" or a "semi pocket" beyond the "nose" or leading edge of the door. That makes "three geographical areas."
The whole trick to being able to adjust the trailing edge of a single door...is to get access to the trailing edge in the following manner. But first another definition--Destination jamb. When a single door has been brought to the fully closed position (nobody can pass by) the leading edge of the door rests in a shallow recess about 1" deep. The door has arrived at the destination jamb. When a future house mechanic removes the trim boards/jambs against which the leading edge of a single door comes to rest, he must find a hidden "demi pocket".
NOW THIS PRESUPPOSES ANOTHER THING. That is why I wanted your carpenters to know that the tracks I made should not be cut. When, once in a blue moon, someone needs to adjust the trailing edge hanger/trailing edge adjustment screw, it is necessary to dismantle the demi pocket trim, draw the leading edge of the door into the demi pocket...which thereby brings the trailing edge "out into the light"-literally. Again, the only way for a mechanic to turn the trailing edge adjustment screw is to bring the trailing edge out of the pocket.
So-the over-riding principles of constructing the geographical areas of a single door are: 1) the jamb boards (looking sideways-that is to say...their thickness) are supposed to cover and conceal the trailing edge and the leading edge of the door when the door is closed (blocking traffic) 2) the jamb boards (both header trim and jamb trim) ought to be attached with visible (usually they are brass screws) fasteners for ease of future disassembly 3) at the leading edge you need to build a demi pocket-deep enough-for the door to go beyond its normal travel area...and therefore 4) wherever the door enters the demi pocket (if only every 50 years for adjustment) there must be track above...That is why I am mentioning that the tracks I made should not be cut.
So to say it again, the (overhead) track must "run long"-beyond the expected area-beyond the visible area. It must run into the territory of the demi pocket-though the demi pocket may only be uncovered once every 50 years!! How "long" should the track run beyond the normal, visible area? About 8"-12". For a house mechanic to adjust the trailing edge adjustment screw, he only needs to insert his shoulder and arm behind the trailing edge. [End of email to contractor in Ohio.]